Wednesday, October 9, 2013

Slow Cooked Beef Roast

Since I don't eat beef, tonight I cooked for Scott. Well I did the prep and let the slow cooker take it from there.  Although I don't eat it I guess I can cook it pretty well since he loved it.  It cooked on low all day (about 8 hours) and the meat just fell apart when it was done.  You can put any type of potato and or vegetables that you want.  Here is what I chose to use:

Beef Roast
Packet of Crockery Gourmet beef seasoning
2 Cups of water
2 large red potatoes, cut into 6 chunks each
3 stalks of celery, cut into 2 inch chunks
1 onion, thickly sliced
1/2 bottle of beer (I used moosehead)
Salt and pepper to taste
Now this is a great meal if you work all day, you can actually prep the whole thing the night before, if your not a morning person, and place in the fridge.  Simply take it out and pop it in the crock pot, flip the switch to low and your out the door worry free for what to do for dinner.
First, place the Beef in the pot and prepare the seasoning by mixing with 2 cups of water. Pour the mix over the beef and add your veggies.  Season with salt and pepper to taste.  Lastly add the beer around the sides of the pot, over the veggies.  Now, as they say, set it and forget it!  No need to poke, stir or even open the lid.  Let slow cook for 8 hours.  Remove your beef and slice.....it should just be falling apart at this point. 
 We served with veggies and bread and butter to dip in some of that gravy from the pot.  Lastly, the best part.....leftovers! Dinner is no done for tomorrow as well!
Enjoy!  

Apple Pie

I bought a tote of apples last week and had about 10 left so I needed to do something with them.  What better than to make a delicious apple pie (served with vanilla ice cream of course)! I once again turned to my Betty Crocker cookbook since she must have the best recipe, right?!? Well as it turns out I was right and here is what you will need to find out for yourself:

6-8 medium apples, peeled and sliced (I used macoun)
1/2 cup sugar
1/4 cup flour
1.5 tablespoons cinnamon
1.5 tablespoons nutmeg
Pinch of salt
3 tablespoons unsalted butter
2 tablespoons water
1.5 tablespoons sugar
Pie crust (I use the pre-made since I don't have time to make it from scratch when I bake at 8pm all the time, it tastes great and you really can't tell a difference)

First line your pie plate with one of the pie crusts.  
Next mix the sugar, flour and spices in a bowl. Add your sliced apples and toss.  Place apple mixture into the pie plate and top with your butter pieces.
 I chose to cut out apple shapes in my top crust but all you need to do is put a couple slits in the center to vent. Place the crust on top, crimping the edges along the pie plate. Brush the top with water ans sprinkle with sugar.  
 Before placing it in the oven wrap the edges of the pie with tin foil to prevent the sides from burning (you will want to remove the foil about 15 minutes before it is done). 
 Bake in a 425 degree oven for about 40 minutes or until golden brown. Let cool on a wire rack for at least an hour and then serve warm topped with vanilla ice cream! 
Enjoy!

Monday, October 7, 2013

Weekly Menu Planning

Happy Monday everyone! This week I decided to plan ahead.  I really don't have time to be running to the grocery store every other night, especially when I usually don't leave work until after 6pm. This past weekend was the first that I had two days off with nothing at all planned, probably since spring! I decided I would spend Saturday morning actually planning what I would cook all week before heading out to the grocery store. This way I would be able to get everything I needed for meals all week without wasting money on grabbing things I could possibly not use or end up with 10lbs of more frozen meat in my freezer. Here is what I plan to make this week and if all goes well there will be plenty of recipes to share along the way:

Monday:
Tomato Basil Chicken Breast over Veggie Pasta 
Tuesday:
Marinated Grilled Pork Chops with Butternut Squash and Mashed Potatoes
Wednesday:
Crock Pot Beef Roast with Red Potatoes
Thursday:
Left Over Beef from Wednesday
Friday:
American Chop Suey or Tacos (this one is still up in the air but we always have the ingredients for both on hand)
Saturday:
Pulled Buffalo Chicken Sandwiches

A few of these I have made before so you can find the recipe for them by clicking on them above. As for the others I will add then as the week goes on. Hope everyone has a great week!

Tomato Basil Chicken Breast

During the week I work pretty late and we have gotten use to eating late.  I could always take the easy way out and get take out on the way home but I like to cook, and cooking at home also saves a lot of money so when you do eat out you can step it up and eat at better places. I love pasta dishes and could probable live on pasta.  Of course if you eat a lot of pasta you should eat whole grain pasta as it is not the best thing for you.  I also love to use veggie pasta since you get all your veggies while eating it. This meal is quick and can be done within 30 minutes and is also super easy.  also, chances are you have everything you need right in your fridge all the time. Here is what you need:

1 large or 2 small chicken breasts, (pounded)
Salt and pepper to taste
2 teaspoons dried basil
4 tablespoons EVOO
1 cup cherry tomatoes, cut in half
2 cloves garlic, minced
4 tablespoons butted
1/2 cup fresh basil, chopped
Parmesan cheese to taste
Pasta of choice
First you want to get your water boiling for your pasta and cook the pasta to your liking.....by the time the pasta is ready you should be finished cooking the chicken.   Season your chicken breast with salt, pepper and dried basil.  Add the EVOO to your skillet and heat.  Once hot add your chicken to the pan and cook on each side about 3-4 minutes.  You want to make sure you do not over cook the chicken or it will be rubbery.
Once you have cooked the second side for about 4 minuted add your tomatoes, fresh basil and butter.  The butter will help make a creamier sauce to put over your pasta.  You can also add the garlic at this time.  Once the butter melts mix the ingredients in the pan and flip the chicken once more.

Turn the heat down to low and simmer for a couple minutes while you drain your pasta.  I like to remove the chicken breast and slice and serve with the sauce over pasta topped with parmesan cheese.  This was absolutely delicious and so quick to make, Enjoy!

Sunday, October 6, 2013

Mini Salted Caramel Apple Pies

It is clearly apple season and there is just tooooo many things that you can do with them.  Baking with them is favorite, everything from cobblers, to cakes, to crisps and most importantly pies!  One of my personal favorites is caramel covered apples, so I decided to take that and turn it into a pie and made these Mini Salted Caramel Apple Pies! I basically used a traditional apple pie recipe and added some chopped up caramel to them.  Here is what you will need,

1 granny smith apple, diced
1 Macintosh apple, diced
1/4 cup sugar
3 tablespoons lemon juice
1 teaspoon cinnamon
1 teaspoon nutmeg
1 egg, lightly beat with 1 tablespoon water
8 chewy caramels, chopped
Sea salt to taste
1 Pre-made pie crust


First I mixed the first 6 ingredients together in a bowl and set aside.  Next I took my pie crusts and placed them on the counter, using a glass I cut out 18 circles.  Line your baking sheet with parchment paper and place half the circles on the sheet.  Spoon the apple filling onto the center of the crusts, leaving room to add the caramel pieces.  Divided the chopped up caramel pieces between all the pies and sprinkle with sea salt.   Place the rest of the crust circles on top and press with a fork around the edges, like below.


 Lastly, with a sharp knife cut slits in the top for ventilation and brush with your egg wash.  Bake at 350 for 20-30 minutes of until golden brown on top.  Remove from oven and serve warm topped with caramel swirled vanilla ice cream! Enjoy!

ABC Chicken Noodle Soup

I am tired of making the same old things and as I said in my precious post, with fall comes soup season. I love soups mainly because they are obviously delicious but also since you make a pot on Sunday and lunch is done for the week! This week I made ABC Chicken Noodle Soup, Scott loves chicken soup and made me write down how I made it last time (clearly I didn't find that card and played it by ear).  Here is what you need and how to make, as Scott said "the best chicken soup I ever had".

4 tablespoons EVOO
2 cloves garlic, smashed
1/3 Vidalia onion, chopped
4 stocks celery, chopped
7 large carrots, peeled and sliced
Sea salt and pepper to taste
1 large can chicken stock, low fat and reduced sodium
1 pre-cooked rotisserie chicken, use all white meat and drum sticks chopped
6 sprigs of thyme
6 sprigs of rosemary
1/2 box ABC pasta
First, heat the olive oil in a large pan and saute the garlic for about 2 minutes on low, being careful not to burn it.  Next add the onion and celery and let cook for about 5 minutes, stirring as needed.  Add the carrots and cook for another 5-10 minutes.  Add the salt and pepper fo taste. Add the chicken stock and chicken and bring to a boil. Reduce to low, add the springs of thyme and rosemary (I tie then together with string for easy removal) and simmer for about 30 minutes to an hour (until carrots are tender). Turn the heat off, remove the herbs and add the pasta. Cover and let sit for about 15 minutes. Spoon into bowls and enjoy!

Wednesday, September 18, 2013

Thanksgiving Shepherds Pie

So at work last week we were talking about different dinner options. There are always the same easy things you make all the time and once in a while you just need something a little different. A co-worker suggested this dish which I call "Thanksgiving Shepherds Pie". Her family makes it after Thanksgiving with all the leftovers but I wanted to try it and didn't want to wait until Thanksgiving to do so. I aldo chose the easy way out and bought the mashed potatoes pre-made and added a little salt, pepper and garlic powder to them. Here are the other items you will need:

Ingredients
1lb of Turkey (boars head ovengold, cut as thick as they can)
6 large carrots (cut into sticks and cooked)
1 box cranberry stuffing (prepare following instructions on box)
Mashed potatoes (family sized stop and shop pre-made)
1 can cranberry sauce
Salt, pepper, garlic powder and paprika to taste

Once all of the above is cooked and ready to go it is quite simple, just layer the items in the order that they are listed in, into a large round casserole. (I love using my temptations since they can go right into the oven, are beautiful to serve with and can be covered and stored all in the same dish, who doesn't love less cleaning?!?!?) Now I didn't add the cranberry sauce since Scott hates it but feel free to put that inbetween the stuffing and potatoes or save and serve on top once done. Once layers, as pictured below, sprinkle with salt pepper and paprika and bake at 350 for 45 minutes to an hour, or until the potatoes look lightly browned. Serve immediately and Enjoy!

Tuesday, September 10, 2013

Top 5 Disney Restaurants

About a year ago this month we traveled to Disney World. I have always loved it there but this time we were lucky enough to get free dining with our package.  This allowed us to eat at some of the best restaurants Disney had to offer. We had everything from seafood, to Italian, to Irish and obviously a Mickey ice cream in between!

If you are planning a trip and want to relax with some nice sit down dinners I would definitely suggest making a reservation at one (if not all) of the following:

Fulton's Crab House (Downtown Disney)
Raglan Road Irish Pub (Downtown Disney)
Cape May Cafe (Beach Club)
Via Napoli (Epcot - Italy)
Lastly if you are traveling with kids or its your first time its always nice to start your day with a little fun, so why not try a Character Breakfast! I would suggest Chef Mickeys at the Contemporary Resort.

So now that you know my favorite places I am sure you would like to know what each offers, here is an idea below of our delicious meals we both had or you can click the links above for full menus.

 Via Napoli


Raglan Road


Snacks!
 

 Fulton's Crab House


Pumpkin Alfredo Pasta

It's pumpkin season, which means pumpkin everything, coffee, muffins, donuts, breads, m&ms and now this.....Pumpkin Alfredo! I picked up this months Food Network Magazine and flipped through quickly, this is when I came across this image,
along with "50 things to make with canned pumpkin". I quickly found No.5, Pasta with Pumpkin Alfredo. This was so simple I had to try it tonight. A quick trip to the store to grab a can of pumpkin (okay, a few cans, since I am sure I will try a few others) and I headed home to whip this up.
Ingredients
1 box veggie pasta, cooked
10 sage leaves
2 tablespoons unsalted butter
1 1/4 cups light cream
1 cup canned pumpkin
Pinch of nutmeg
Salt and pepper to taste
Grated Parmesan cheese
Like I said, this is super simple. First saute the sage leaves in the butter. Whisk in the cream, pumpkin and nutmeg. Simmer for 5 minutes and toss with pasta. Add salt and pepper to taste. Serve topped with grated Parmesan and you can always add a couple sage leaves to make it pretty! That's it, time to enjoy! 
 Stay tuned, I have 49 other pumpkin recipes to go through and possibly try!

Thursday, September 5, 2013

Zucchini Bread

Well, September is here and with that brings the unofficial start or the Fall season. I have a love hate relationship with Fall. I love to bake so this means pumpkin and apple everything as well as another season to redecorate for. The negative, warm weather is slowly disappearing and the cold snowy season will be here before we know it.

We had a clam boil on Sunday and spent Labor Day recovering. After relaxing all day I decides to make a couple zucchini breads to start off the baking season. I came across a very very large zucchini on our garden that me and Scott both missed somehow, so it was the perfect excuse to get baking!
I went to my favorite cookbook, a gift from my brother and soon to be sister-in-law (thanks Krystal, as I know you were the one who actually picked it out), Betty Crocker COOKBOOK, Bridal Edition Here is what you will need and how to make the breads:
 Ingredients
3 cups shredded zucchini
1 2/3 cups sugar
2/3 cup veg. oil
2 teaspoons vanilla
4 large eggs
3 cups all-purpose flour
2 teaspoons baking soda
1 teaspoon of salt
2 teaspoons ground cinnamon
2 teaspoons nutmeg
1 cup chopped nuts

Directions
Heat oven to 350 degrees and grease the bottom only of 2 8x4 loaf pans.  In a large bowl stir zucchini, sugar, eggs, oil and vanilla until well mixed.  Stir in the remaining ingredients except the nuts.  (Now at this point I completely overlooked the cinnamon and nutmeg, so I ended up just swirling it in gently after I had already placed the batter in the pans) Lastly stir in the nuts (I used walnuts since that is what I had but Pistachios or even topping it with sunflower seeds would be excellent choices as well!)  Divide batter evenly between the 2 pans.  Bake for 50-60 minutes or until lightly browned on top and a toothpick comes out clean.  Cool loaves for 10 minutes in pan on a wire cooling rack.  Loosen the sides of the breads and remove from pans.  Place top side up on wire rack to cool completely.  Wrap tightly and store at room temperature for about 4 days or refrigerate up to 10 days.
Now, I hate my oven so of course I used the toaster oven, you can really make anything in a toaster oven. Okay okay, maybe not a baked ham or a turkey dinner, but almost anything! I let my neighbor have half a loaf, since she saved me when I didn't have enough flour, and she ate half before I even left the house! Must be good, especially since my dad said it was the best he has ever had and needs the recipe!  Enjoy


***Nutritional Info (per slice)
CAL. 95 FAT 4g CHOL. 15mg SODIUM 110mg CARBS. 13g PRO. 2g

Monday, August 19, 2013

Peach Cobbler Ice Cream Cake

Yesterday was my moms, something something, birthday.  She didn't want to have a party and just wanted to relax in the pool all day.  I had told her about a recipe I had come across in Food Network Magazine a few weeks back that she said sounded great. I had told her I would make it for her birthday, just because there is no party doesn't mean you shouldn't have a cake! What's better than an ice cream cake in August......? Well, a Peach Cobbler Ice Cream Cake! 

This is not a cake you should attempt to make last minute and expect to just throw it together, there are many many steps involved.  I would have to say this is the most time consuming cake I have ever made. Not so much actual work but waiting. You get to wait anywhere from 15 minutes to 6 hours through the entire, I'd say, 10 hour process. Now don't get me wrong, it is TOTALLY worth it and easy, just time consuming. 

Like I said, this one came from a magazine and I followed the recipe exactly, see below for ingredients and directions:
 Now mine didn't quite look exactly like the original but I would say it came pretty close and the flavor was amazing!  Happy Birthday Mother, I love you! Enjoy!
 

Sunday, August 11, 2013

Blackberry Tarts with Homegrown Blackberries

Today when I arrived home I took a walk through the garden as I do every night. As I took a look at the progress of our fruit and vegetable plants I noticed that it was finally time to harvest some blackberries! I began to pick them and soon realized I needed a bowl! I filled it up and started to think about what I should make with them. 


I had bought some pre-made mini graham cracker crusts and also had a tub of cool whip.....that was all I needed!  I began to smash the blackberries with a fork in a large bowl, being careful not to burst all over, blackberry stains are not something I want to have to deal with!  I then began to fill my shells half way with just the berry pieces, reserving the juice.  Once filled I added about a third of the tub of cool whip to the liquid and mixed thoroughly.  I then topped the tarts with the blackberry infused cool whip and topped with a single fresh picked blackberry!  Super easy for a last minute dessert for two or an intimate gathering.  Enjoy!


Bridal Shower Tea Party

Now this post is way overdue, but with summer comes long days and jam packed weekends. With summer also comes wedding season which means showers, bachelorette parties and the actual weddings. I was not expecting to be in one of my best friends weddings but when she asked me I was so excited and honored, this was my first time being a bridesmaid and I knew exactly what to expect. I have planned enough weddings in the past few years which is why I was probably more excited about being a bridesmaid then the normal girl.  Part of a bridesmaids job is throwing the bridal shower. The bride knew exactly what she wanted, so there was no issue with choosing a theme, it was a tea party. Floral dresses, big floppy hats, tea cups, honey favors, tea sandwiches and desserts, which brings me to this post. 

Baking is my thing, yes I like to cook, but baking is what I love. The bride is on pinterest, obviously, so I started there for inspiration, and she gave us plenty to work with!  To me the final details of baking is what makes a dessert, you know, the pretty part, not the technical. When you are hosting an event with lots of food, your guests will first judge what they choose by sight. If it doesn't look pretty to the eye, then chances are they won't choose it and move on to what looks nice. My main project was a tea party Barbie cake.
The bride and I did not meet until high school but learned that we were both obsessed with Barbie growing up. (To think if we were friends in our younger days!) I got to work with the technical part, baking and shaping her gown, and the MOB made the most beautiful floppy hat to finish her off (details!). I then started with the pretty part, frosting! Hand-piped mini flowers, round and round and round until she was perfect! What a hit, everyone loved her and asked when to cut it....hahaha obviously she wasn't going to be cut up until later that night when the shower was over, silly people! Sometimes when things are too pretty you just can't break down and ruin it to soon!

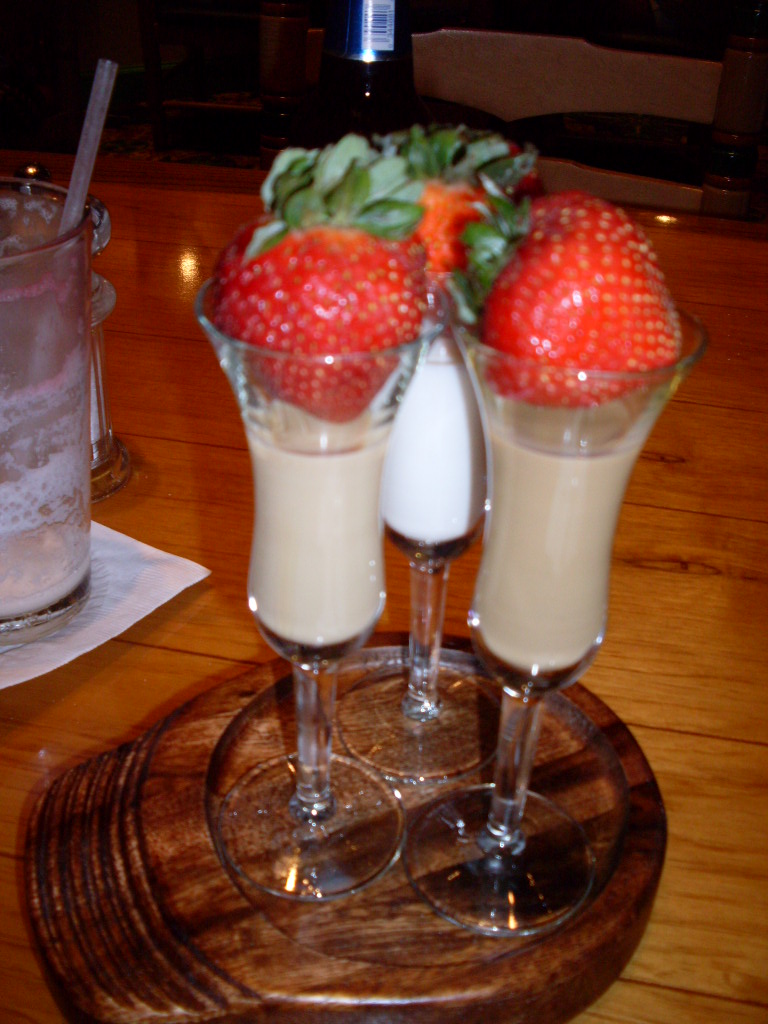
Next I got to work on three different mini desserts served in their own little individual "shot glass". Three flavors, banana cream pie, chocolate Oreo and cherry cheesecake, all with their own little silver spoon. These were quite simple ans they had to be, I made about 100 of them! The secret, pudding! So simple yet so pretty and delicious. The banana cream pie was made with banana pudding, mini vanilla wafers and fresh sliced banana. The chocolate Oreo was Oreo pudding and mini Oreos and lastly the cherry cheesecake was cheesecake pudding and cherry pie filling. The key, serving in cute little individual glasses, neatly layered and finished with a mini silver spoon. Who can resist a cute, little, easy individual dessert. This makes it easy to grab and enjoy. The small portion also allows you to try one of each and not feel as guilty! I'll say it once more, presentation, finishing details to make food beautiful is key. 

So you may be thinking that I was done, well I wasn't. What's a tea party, or any party for that matter, without cupcakes! I decided to make two types, white chocolate raspberry chocolate and also Strawberry Pineapple.  I used basic boxed cake mixes for both cupcakes, chocolate and strawberry.  On the chocolate I then used the white chocolate raspberry frosting flavoring and added that to pre-made butter-cream frosting, topped it with a fresh raspberry and beautiful! On the strawberry I substituted the water in the cake instructions with pineapple juice and reserved the actual crushed pineapple (from 1 large can of crushed pineapple) to add to butter-cream frosting.  Lastly, I picked up some cute little floral cupcake pan liners at Michael's just to make them stand out and go along with our theme.  One last time, making things pretty is the best part of baking! Enjoy!

Sunday, July 21, 2013

Grilled Zucchini

There is nothing better in the hot summer months than fresh veggies from the garden!  We have planted a wide variety this season, tomatoes, cucumbers, peas, beans, swiss chard, brussels sprouts, corn and lots and lots of herbs.  When veggies are freshly picked you don't want to boil them and lose that fresh picked flavor.  So tonight when we picked our first zucchini of the season we decided to grill it.  In my opinion it is the best way I have ever had it!
So this is super easy, all you need to do is slice your zucchini into fours.  While we wanted to stick to not losing the natural fresh taste we decided to lightly brush it with olive oil and then just add some salt and pepper to taste. Place them face down on the grill and cook until lightly chard. Remove and serve as the perfect summer side.  I decided to serve these with my Sauteed chicken with Browned Sage Butter!  Enjoy!


Sauteed Chicken with Browned Sage Butter

With it being summer most people like to enjoy grilled food.  For us we cook almost every night on the grill, both the meat and the sides.  I am getting to the point that I just can't seem to eat anymore grilled chicken.  So tonight I decided to saute chicken breasts in the house with some browned sage butter.  It was so delicious (and easy) that I plan on making it again this week! Here is what you will need to make this fresh juicy chicken.

2 Chicken Breasts (cut in half and pounded to 1/4 inch)
1/2 Cup Flour
Salt and Pepper to Taste
Olive Oil Cooking Spray
5 Tablespoons Butter
2 Sprigs Fresh Sage
3 Teaspoons Fresh Thyme
2 Tablespoons Lemon Juice

First you want to salt and pepper your chicken to taste.  Next spray down your saute pan with the olive oil cooking pray and heat your pan.  While the pan is heating, lightly coat each side of the chicken breast with flour.  Now it is time to add your chicken to the pan, cook on medium heat about 4 minutes on each side (or until cooked through).  Remove the chicken from the pan and set aside.  Immediately add the butter and sage sprigs to the hot seasoned pan. Cook until butter is browned.  Remove the sage and add the thyme to the butter, cook about 30 seconds (being careful that the thyme does not burn).  Lastly add the lemon juice to the pan and throw the chicken back in.  It is now time to serve and top with the butter sauce! 


Although I am tired of grilled chicken, veggies are still delish on the grill!  While I was making the chicken my husband threw some fresh corn on the cob and zucchini that be picked fresh from the garden on the grill to have with our chicken.  Perfect summer meal, Enjoy!


Thursday, June 13, 2013

Corn Bowl

So tonight's original dinner was a mess!! I didn't get home until about 8:30 and then had to cook dinner.  I ran to the store to grab a quick pre-made frozen stir-fry dinner......yes I know, they are terrible for you! Well then, it must have been a sign I shouldn't eat it when I put it in the pan and forgot about it and burnt it....ooopps!

So this means that I needed to think of something quick, since at this point I was starving.  I through a bag of steamfresh corn in the microwave to hold me over.....then I took a look in the fridge to find some tomatoes, olives and kielbasa.  I simply sliced all three and sauteed in EVOO until the kielbasa was cooked.  Threw this on top of the corn and that was dinner!
Honestly, it was DELICIOUS!  I will probably make it again as both Scott and I loved it, this shows you never know what you can do when your starving with what you have in the fridge! Enjoy!

Monday, June 10, 2013

Men Can Cook Too!

Men can cook too!
I texted my husband tonight to tell him I would make American Chop Suey, his favorite, when I got home.  When I get home late he usually will start dinner, the protein at least, so I can just throw together some sides when I get home.  I wanted to make sure he didn't bother tonight.  If you have read my post on American Chop Suey, you know I don't eat it.  My husband texted me and asked if I could let him know when I was on my way, at this point I knew he would be cooking something for me, and I was right! 

He made me an egg sandwich, but not your typical egg sandwich.  There is no bread in this sandwich, the eggs are the bread, and in between them is the kielbasa, tomatoes and taco cheese for a bit of heat. Topped with salt and pepper to finish.  A simple, quick and most importantly, delicious sandwich, without all the carbs of bread! It was so good I had him make me another, might just be a new favorite!