Thursday, January 23, 2014

Do It Yourself: Custom Headboard

I typically only blog about food but last weekend I finally decided to complete my headboard, and just had to show you how easy it is.  I have always wanted an upholstered headboard but there are so many styles, fabrics, and patterns to choose from.....the possibilities are countless.  A few weeks back I finally came across the below fabric (it is actually a curtain) and loved it.  It combined all of the colors involved in our bedroom. 


Materials:
Plywood or Drywall
Fabric
Staple Gun
Scissors
2 - 2x4

 I had Scott work on the frame.  He actually had some drywall hanging around so we decided to use that.  I sketched out a design and he cut it out so I could get to work!


I began by cutting two pieces of batting the length and width of the drywall.  One at a time, lay them flat on the floor and staple along edges.  Be sure to pull tight so that it will be flat and not bumpy.  I stated with the top, then the bottom, followed by the sides and lastly the curves at the top.  Repeat with the second piece of batting.


Before attaching the fabric, cut the 2x4 (if needed) to fit across the length of your headboard, about 12 inches below the top.  You can use the same size or a smaller one to add to the bottom just to balance the headboard against the wall once you hang it (see below). Screw these in from the front.


Be sure that your fabric is wrinkle free before attaching.  Lay the fabric flat on the floor and attach in the same manner as the batting.  If you are using a pattern (especially is there are stripes of any kind) you want to make sure that the fabric is straight as well.  Attach the ring hangers to the top 2x4 (make sure to measure where you will hang it before attaching hangers, you want to make sure you have stud where it will attach to the wall) and you are ready to hang it up on the wall!


Normally upholstered headboards can end up costing you 100's even 1000's of dollars depending on style, company and fabric choices.  By doing it yourself, this only cost me a little under $20, not including the items I already had hanging around!  By doing it this way it it also makes it very easy to remove and change the fabric when you feel like you need a change, Happy Crafting! 

Wednesday, January 22, 2014

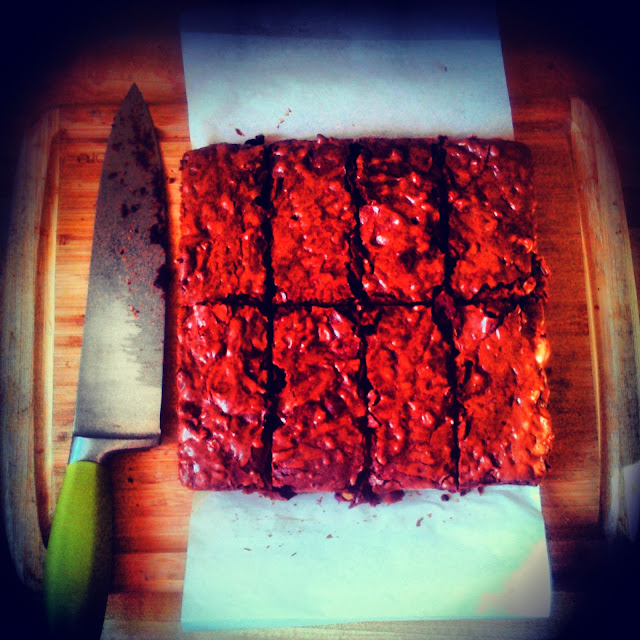
Snow Day Brownies


I have to say that I have definitely had enough snow this winter and I am ready for warmer, longer days.  On the plus side, this snow has made today a "snow day".  While Scott is out hard at work removing snow from countless homes I decided to whip up some brownies for when he gets home, as well as throw some Italian Herb Chicken in the crock pot for dinner.  These brownies are super simple and most people will already have all the ingredients needed in their fridge and pantry.  Here is what you will need to get started:    


10 Tablespoons Unsalted Butter
1 Cup of Sugar
3/4 Cup of Cocoa Powder
1/2 Teaspoon of Salt
2 Teaspoons of Vanilla
2 Large Eggs
1/2 Cup of Flour
3/4 Cup Chopped Walnuts
1/2 Cup Mini Semi-Sweet Chocolate Chips


In a medium saucepan bring about 2 inches of water to a simmer.  In a heat safe bowl, combine the butter, sugar, cocoa and salt.  Place the bowl on the pan of simmering water until the butter is melted, stirring occasionally. Once melted, remove bowl from pan and let cool about 5 minutes.


Stir in the vanilla.  Next, add the eggs one at a time stirring well after each addition.  Once well mixed, stir in the flour until combined.  Lastly, beat with a wooden spoon for about 2 minutes.  Batter will be very thick.


Finally, stir in the nuts and chips.


Spread batter into a parchment lined 8x8 pan and bake for 20-30 minutes in a 325 degree oven.  


Remove from pan and let cool for about 15 minutes before slicing.  Eat alone or topped with vanilla ice cream for a brownie sundae. Or for Super Bowl Sunday cut into little footballs and, with a stencil, dust with powdered sugar! Enjoy!

Tuesday, January 7, 2014

Eggnog Rice Pudding

So now that the holidays are done you most likely have some leftover eggnog lurking in the fridge and just can't drink another glass.  I know that I did and also had some leftover rice from dinner, which got me thinking.....how about some eggnog rice pudding! I threw a few things together not expecting much but let me tell you AMAZING! Now my only problem is I threw it together so I measured nothing, which is why I am currently making another batch to make sure I let you know how to make it correctly. So here is what you will need.


2 cups of cooked white or jasmine rice
1 1/4 cup of eggnog
1/4 cup brown sugar
1 tablespoon honey 
1 egg (beaten)
1 tablespoon unsalted butter
1 teaspoon cinnamon
1 tablespoon vanilla extract 
Raisins are optional and can be added to taste


In a medium pan add the rice, 1 cup of eggnog, sugar and honey. Cook on medium/low for about 10 minutes or until thick and creamy, storing occasionally. Next, in a small bowl beat the egg with 1/4 cup of eggnog.  One the rice mixture is ready add a small amount of the rice to the egg mixture to temper the mixture before adding it to the pan. Add this mixture to the pan and cook on low for about 2 minutes, stirring constantly.  Remove from heat and add the butter, vanilla and cinnamon (raison as well, if you choose to). Top with cinnamon, and or whip cream and serve warm. Enjoy!

Wednesday, October 9, 2013

Slow Cooked Beef Roast

Since I don't eat beef, tonight I cooked for Scott. Well I did the prep and let the slow cooker take it from there.  Although I don't eat it I guess I can cook it pretty well since he loved it.  It cooked on low all day (about 8 hours) and the meat just fell apart when it was done.  You can put any type of potato and or vegetables that you want.  Here is what I chose to use:

Beef Roast
Packet of Crockery Gourmet beef seasoning
2 Cups of water
2 large red potatoes, cut into 6 chunks each
3 stalks of celery, cut into 2 inch chunks
1 onion, thickly sliced
1/2 bottle of beer (I used moosehead)
Salt and pepper to taste
Now this is a great meal if you work all day, you can actually prep the whole thing the night before, if your not a morning person, and place in the fridge.  Simply take it out and pop it in the crock pot, flip the switch to low and your out the door worry free for what to do for dinner.
First, place the Beef in the pot and prepare the seasoning by mixing with 2 cups of water. Pour the mix over the beef and add your veggies.  Season with salt and pepper to taste.  Lastly add the beer around the sides of the pot, over the veggies.  Now, as they say, set it and forget it!  No need to poke, stir or even open the lid.  Let slow cook for 8 hours.  Remove your beef and slice.....it should just be falling apart at this point. 
 We served with veggies and bread and butter to dip in some of that gravy from the pot.  Lastly, the best part.....leftovers! Dinner is no done for tomorrow as well!
Enjoy!  

Apple Pie

I bought a tote of apples last week and had about 10 left so I needed to do something with them.  What better than to make a delicious apple pie (served with vanilla ice cream of course)! I once again turned to my Betty Crocker cookbook since she must have the best recipe, right?!? Well as it turns out I was right and here is what you will need to find out for yourself:

6-8 medium apples, peeled and sliced (I used macoun)
1/2 cup sugar
1/4 cup flour
1.5 tablespoons cinnamon
1.5 tablespoons nutmeg
Pinch of salt
3 tablespoons unsalted butter
2 tablespoons water
1.5 tablespoons sugar
Pie crust (I use the pre-made since I don't have time to make it from scratch when I bake at 8pm all the time, it tastes great and you really can't tell a difference)

First line your pie plate with one of the pie crusts.  
Next mix the sugar, flour and spices in a bowl. Add your sliced apples and toss.  Place apple mixture into the pie plate and top with your butter pieces.
 I chose to cut out apple shapes in my top crust but all you need to do is put a couple slits in the center to vent. Place the crust on top, crimping the edges along the pie plate. Brush the top with water ans sprinkle with sugar.  
 Before placing it in the oven wrap the edges of the pie with tin foil to prevent the sides from burning (you will want to remove the foil about 15 minutes before it is done). 
 Bake in a 425 degree oven for about 40 minutes or until golden brown. Let cool on a wire rack for at least an hour and then serve warm topped with vanilla ice cream! 
Enjoy!

Monday, October 7, 2013

Weekly Menu Planning

Happy Monday everyone! This week I decided to plan ahead.  I really don't have time to be running to the grocery store every other night, especially when I usually don't leave work until after 6pm. This past weekend was the first that I had two days off with nothing at all planned, probably since spring! I decided I would spend Saturday morning actually planning what I would cook all week before heading out to the grocery store. This way I would be able to get everything I needed for meals all week without wasting money on grabbing things I could possibly not use or end up with 10lbs of more frozen meat in my freezer. Here is what I plan to make this week and if all goes well there will be plenty of recipes to share along the way:

Monday:
Tomato Basil Chicken Breast over Veggie Pasta 
Tuesday:
Marinated Grilled Pork Chops with Butternut Squash and Mashed Potatoes
Wednesday:
Crock Pot Beef Roast with Red Potatoes
Thursday:
Left Over Beef from Wednesday
Friday:
American Chop Suey or Tacos (this one is still up in the air but we always have the ingredients for both on hand)
Saturday:
Pulled Buffalo Chicken Sandwiches

A few of these I have made before so you can find the recipe for them by clicking on them above. As for the others I will add then as the week goes on. Hope everyone has a great week!

Tomato Basil Chicken Breast

During the week I work pretty late and we have gotten use to eating late.  I could always take the easy way out and get take out on the way home but I like to cook, and cooking at home also saves a lot of money so when you do eat out you can step it up and eat at better places. I love pasta dishes and could probable live on pasta.  Of course if you eat a lot of pasta you should eat whole grain pasta as it is not the best thing for you.  I also love to use veggie pasta since you get all your veggies while eating it. This meal is quick and can be done within 30 minutes and is also super easy.  also, chances are you have everything you need right in your fridge all the time. Here is what you need:

1 large or 2 small chicken breasts, (pounded)
Salt and pepper to taste
2 teaspoons dried basil
4 tablespoons EVOO
1 cup cherry tomatoes, cut in half
2 cloves garlic, minced
4 tablespoons butted
1/2 cup fresh basil, chopped
Parmesan cheese to taste
Pasta of choice
First you want to get your water boiling for your pasta and cook the pasta to your liking.....by the time the pasta is ready you should be finished cooking the chicken.   Season your chicken breast with salt, pepper and dried basil.  Add the EVOO to your skillet and heat.  Once hot add your chicken to the pan and cook on each side about 3-4 minutes.  You want to make sure you do not over cook the chicken or it will be rubbery.
Once you have cooked the second side for about 4 minuted add your tomatoes, fresh basil and butter.  The butter will help make a creamier sauce to put over your pasta.  You can also add the garlic at this time.  Once the butter melts mix the ingredients in the pan and flip the chicken once more.

Turn the heat down to low and simmer for a couple minutes while you drain your pasta.  I like to remove the chicken breast and slice and serve with the sauce over pasta topped with parmesan cheese.  This was absolutely delicious and so quick to make, Enjoy!